Sharpening a Twist Bit by Hand
 Callum Reith-Sowande
I remember standing on a job site back in the nineties, watching a young lad struggle with a cordless driver, swearing at a hole that refused to go any deeper. He was pushing with his whole weight, smoke practically rising from the timber, convinced he just needed a more powerful motor. I walked over, took his bit, and showed him that the problem wasn't the tool's torque; it was the edge. Most people think you just toss a dull bit in the bin and buy a new pack, but learning how to sharpen a drill bit is the difference between a craftsman and a consumer. A bit that can’t bite is just a piece of scrap metal causing unnecessary heat and mess.
I’m not here to give you some complicated, industrial procedure that requires a laboratory setup. I want to show you how to get a true, clean edge using basic tools you likely already have sitting on your bench. I'll walk you through the proper angles, the importance of the clearance, and how to avoid the common mistakes that ruin a bit for good. By the time we're done, you'll stop fighting your drill and start letting the steel do the work.
Guide Overview
Tools & Supplies
- Bench grinder or angle grinder with grinding wheel
- Drill bit sharpener jig or handheld vise
- Water container for cooling
- Safety glasses and gloves
Step-by-Step Instructions
- 1. First, you need to get your eyes on the damage. Don't just grab a grinder and start spinning; you'll ruin the temper before you've even begun. Hold the bit up to a good, bright light and look at the cutting edges. You're looking for chipped lips or a rounded-off point. If the bit is twisted or snapped, well, it’s scrap metal, and I won't waste my time teaching you how to polish a corpse.
- 2. Set up your bench grinder, but for heaven's sake, check your stones first. If you’re using a coarse grit wheel that’s pitted and uneven, you’re just going to wander all over the bit and create a mess. I prefer a fine-grit oil stone if I’m doing precision work, but if you're using a bench grinder, make sure the face is perfectly flat and free of any built-up debris from the last job.
- 3. Now, you have to find that crucial angle. For a standard twist bit, you’re aiming for about 118 degrees. I used to see apprentices try to wing it, but that's how you end up with a bit that wanders across the timber like a drunkard. Hold the bit against the wheel and maintain a steady, consistent tilt. You aren't just grinding metal; you are recreating a geometry that the factory intended.
- 4. This is where most people fail: they let the tool get too hot. If you see the steel turning a dark blue or straw colour, you’ve gone too far. You’ve killed the temper, and once that happens, the metal becomes soft as butter and will go blunt the second it touches a knot in the oak. Keep a small cup of water right next to you and dip the bit constantly to keep it cool to the touch.
- 5. Once you've ground the primary bevel, you need to address the chisel edge—that’s the very tip that actually does the biting. You want to lightly touch the very edge of the cutting lip against the stone to create a micro-bevel. It doesn't need to be a massive grind; just a tiny, sharp flick to ensure the edge is crisp. A bit with a flat face is just a blunt rod; it needs that sharp, decisive edge to work.
- 6. Now, check your symmetry. Look down the length of the bit to make sure the two cutting lips are the same length. If one is longer than the other, the bit will walk off your mark every single time you pull the trigger. If it’s uneven, go back to the grinder and take a tiny bit more off the longer side until they match perfectly.
- 7. The final test isn't with your eyes, it's with your hands. Take a scrap piece of softwood and try to run the tip of the bit across it. If it skates over the surface without catching, it’s still blunt. A properly sharpened bit should bite into the grain with almost no pressure applied. If it grabs and cuts, you're ready to get back to work.
Mastering the Drill Bit Point Geometry for Clean Cuts
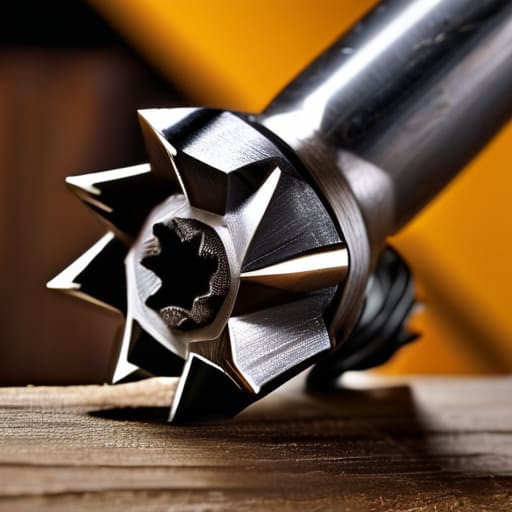
Most lads make the mistake of thinking that as long as there is metal on the edge, the bit will work. They aren't wrong, but they'll be fighting the machine all day. To get a clean, straight hole without the bit wandering, you have to pay attention to the drill bit point geometry. If your two cutting edges aren't exactly symmetrical, the bit will naturally want to pull to one side. I’ve seen plenty of apprentices ruin a perfectly good piece of hardwood simply because they didn't realize their angles were lopsided.
When you're working through your hss drill bit maintenance, don't just aim for "sharp"—aim for precision. You need to ensure that the drill bit cutting angle remains consistent across both flutes. If you're using a bench grinder, you can't just hold it by hand and hope for the best; you'll end up with a mess. I always suggest a steadying hand or a dedicated jig to keep that angle true. It takes a bit more patience, but a bit that bites exactly where you tell it to is worth its weight in gold.
Optimizing Your Drill Bit Cutting Angle With a Sharpening Jig Setup

If you try to do this by eye, you're asking for a headache. I've seen many a lad at the college try to eyeball the angle on a grinder, only to end up with a bit that wanders the second it touches the timber. That’s why a proper sharpening jig setup is worth its weight in gold. A jig takes the guesswork out of it, ensuring that your drill bit cutting angle stays consistent across every single grind. Without that stability, you aren't sharpening; you're just guessing, and a guessing bit is a dangerous bit.
When you’re setting up, remember that consistency is your best friend. Whether you are working on a standard twist bit or performing more serious hss drill bit maintenance, the jig forces you to maintain that critical relationship between the lip and the heel. I always tell my students: don't rush the adjustment. Take the time to lock your angles in tight. If the jig is steady, the edge will be too. It’s the difference between a bit that bites and a bit that just rubs and burns.
Five Things Most Bloke Get Wrong With a Drill Bit
- Stop guessing the angle. If your lips aren't even on both sides, the bit will wander like a drunk on a Friday night, and you'll end up with a hole that's more of a suggestion than a measurement.
- Watch your heat. If you see the steel turning blue, you've gone and ruined the temper. Once that's done, the metal is soft, and it'll be blunt again before you've even finished your first hole.
- Don't go chasing perfection on a bit that's already dead. If the flute is twisted or the shank is bent, bin it. I don't believe in wasting time trying to fix something that's lost its soul.
- Check your clearance. It’s not just about the cutting edge; you need that relief behind the lip so the tool actually bites into the timber instead of just rubbing against it and creating heat.
- Use a proper stone, not some cheap emery cloth. A good, fine-grit oil stone is the only way to get a truly keen edge that’ll slice through hardwoods without needing to be pushed.
The Sharp Edge of Truth

At the end of the day, sharpening a drill bit isn't about chasing perfection; it’s about respect for the material. You’ve learned that if you get the point geometry right and hold your angle steady with the jig, you aren't just making a hole—you're controlling the cut. Don't let a dull bit wander through your timber or burn your workpiece just because you were too impatient to spend ten minutes at the grinder. Once you’ve mastered that correct cutting angle and cleared away the burrs, you'll find that the tool does most of the heavy lifting for you. It’s the difference between fighting the wood and actually working with it.
I see too many young lads heading to the hardware store to buy a fresh pack of bits the moment things get a bit sluggish. It’s a waste of money and a waste of good steel. My rule remains the same: if you can't fix it, you shouldn't own it. Taking the time to hone your own tools builds a connection to your craft that a shiny new box of consumables never will. So, put the new bits back on the shelf. Pick up your old, blunt bit, get to the stone, and prove the tool's worth all over again. A bit that’s been cared for will outlast any cheap modern equivalent you'll ever find.